
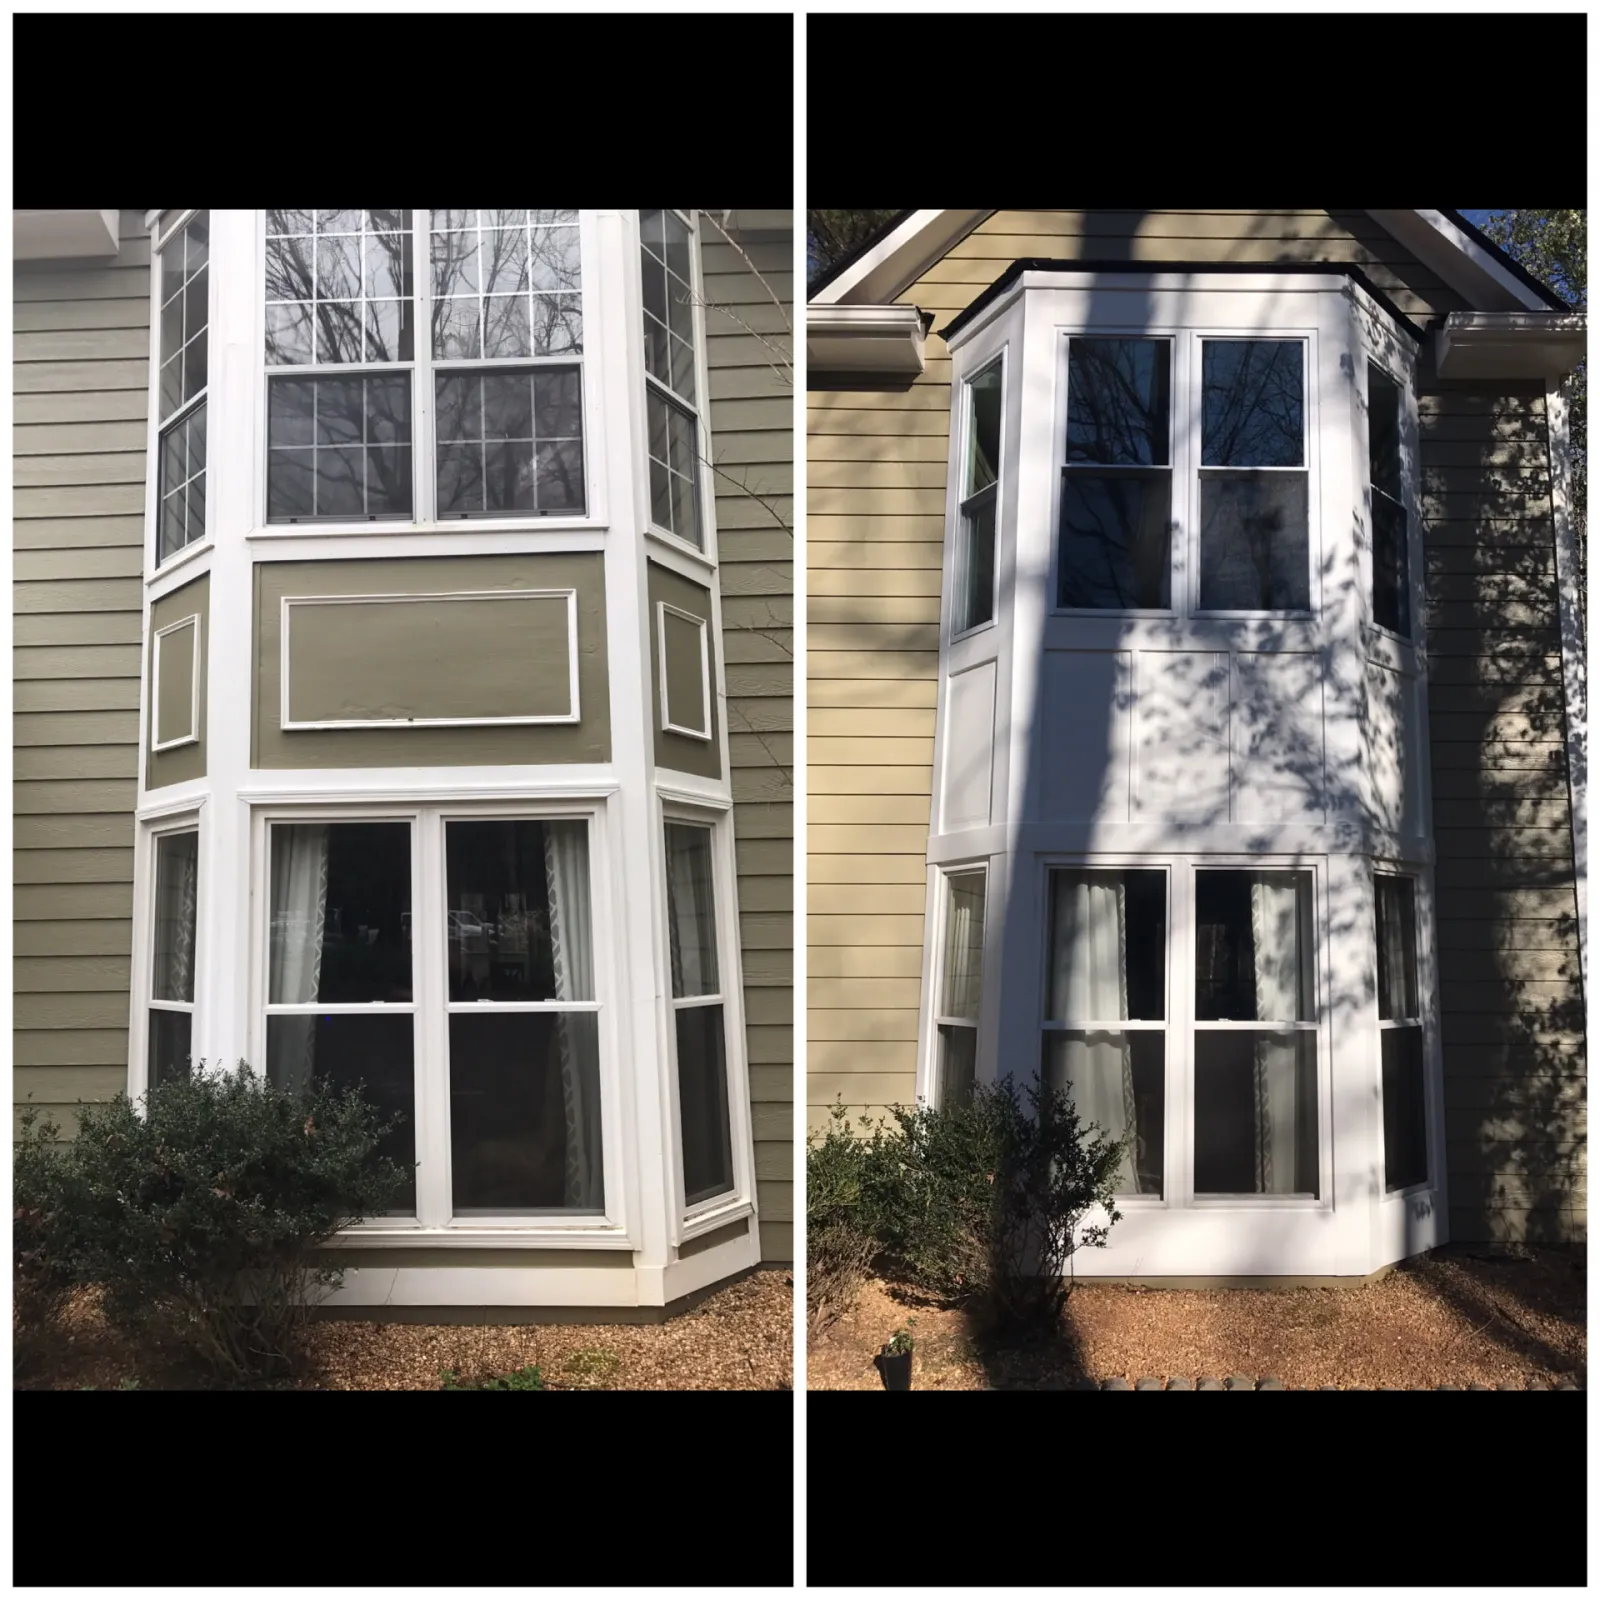
The two story bay tower in the photo above is the kind of project that starts with a homeowner saying the house just needs paint. It did need paint. It also needed the trim, the panel below the glass and part of the corner boards replaced first, because the paint had already failed twice for the same reason: the wood underneath was staying wet.
If you own a home in Buford, Lawrenceville or anywhere in Gwinnett County built in the last thirty five years, rotted window trim and fascia is the single most common exterior repair we get called about. Here is how it happens, how to find it before it gets expensive, and what a real repair includes.
Why window trim rots so fast in North Georgia
Nothing about our climate is gentle on painted wood:
- Humidity. Long humid summers keep wood at a moisture content where fungus is happy.
- Hard rain from the side. Georgia storms drive water at walls horizontally, straight into the joints paint is supposed to protect.
- Pine and finger jointed trim. Builder grade trim on late 80s through 2000s subdivisions is soft, often finger jointed, and frequently installed without back priming.
- Caulk used as a substitute for flashing. Caulk is a five to ten year material. Flashing is permanent. Thousands of homes around here were built with the wrong one doing the important job.
Water gets in at one failed joint, wicks along the grain, and works outward from the inside. That is why the wood can be gone before the paint looks bad.
The five places to check on your own house
Take ten minutes with a flashlight and a screwdriver and check:
- 1.Bottom corners of window trim. Where the vertical leg meets the sill, this is where water stands. It is the first place to go.
- 2.Window sills and the panel under a bay. On the bay tower in the photo, the flat panel below the glass had been holding water behind a painted joint for years.
- 3.Fascia behind the gutters. Clogged or undersized gutters overflow behind the fascia and soak it from the back. If your fascia paint is peeling in long strips, look at the gutters first.
- 4.Rake boards and gable trim. High, hard to reach, and rarely inspected, which is exactly why they fail.
- 5.Corner boards and the bottom two courses of siding. Splash back and mulch beds hold moisture against the wall.
Press with the screwdriver. If it sinks, note it. If you find rot in three of those five locations, the problem is a system problem, not a spot repair.
What a real repair includes
A repair that lasts has five steps, and skipping any one of them is why homeowners end up paying twice:
1. Cut back to sound material. We remove trim until the screwdriver stops sinking, then take a few more inches. Rot travels farther than it looks.
2. Fix the water source. New trim on an unsolved leak is a countdown. Depending on what we find, that means correcting head flashing, adding a kickout at a roof to wall junction, re-pitching or resizing gutters, replacing a failed window pan, or reworking the roof edge with our roofing crew.
3. Replace with material that cannot rot. Fiber cement or cellular PVC, fastened properly, joints flashed rather than only caulked. On fiber cement siding homes we flash behind every butt joint, which is the detail most crews skip.
4. Prime everything, including cut ends. Every field cut on fiber cement gets sealed. Every PVC joint gets the right adhesive. Bare edges are how water gets a second chance.
5. Paint with the right system. High quality acrylic, two coats, correct film thickness. This is where our exterior painting work either protects the repair for a decade or does not.
The bay tower project in the photo
On the left you can see the original condition: a painted panel below the glass, aged caulk lines, and trim that had been coated over so many times the joints were sealed shut and holding water. On the right, the panel is a new board and batten style detail, the trim is replaced and painted a clean white, and the caulk joints are new and sized correctly.
Two details worth pointing out:
- We changed the panel detail slightly instead of trying to recreate a builder detail that was never going to shed water. Small design changes that improve drainage are almost always worth it.
- The color change to white brightened a dated olive elevation without touching the siding. Homeowners are often surprised how much of the perceived age of a house lives in the trim color.
Repair now or replace the siding?
Sometimes a repair is the wrong answer. The rough rule we use with homeowners:
- Repair when the damage is confined to trim, fascia and a few boards, and the siding field is otherwise sound and paintable.
- Replace when you are repairing the same walls repeatedly, when hardboard siding is swelling and chalking across whole elevations, or when the cost of repairs plus a full repaint starts approaching new siding. At that point new vinyl siding or fiber cement often makes more sense, and it comes with a manufacturer warranty a repaint never will.
We will tell you plainly which side of that line your house is on. If a repair is enough, we say so.
Timing in Buford and Lawrenceville
Our busiest repair season is late winter through spring, right after storms expose everything. If you find rot in the fall, that is actually the ideal time to fix it: humidity is down, paint cures well, and you are not sending a compromised wall into a wet winter.
What you get from EZY Exteriors
Written scope before we start. Photos of what we find behind the trim. Licensed and insured crews. Cleanup daily. A workmanship warranty on top of the manufacturer coverage. Over twenty five years of exterior work in North Georgia, and financing available if the repair list is bigger than you planned for.
If you pressed a screwdriver into your trim this morning and it went in, request a written estimate and we will look at the whole picture, not just the one soft corner.